Simple Origami Box for Little KeepSakes

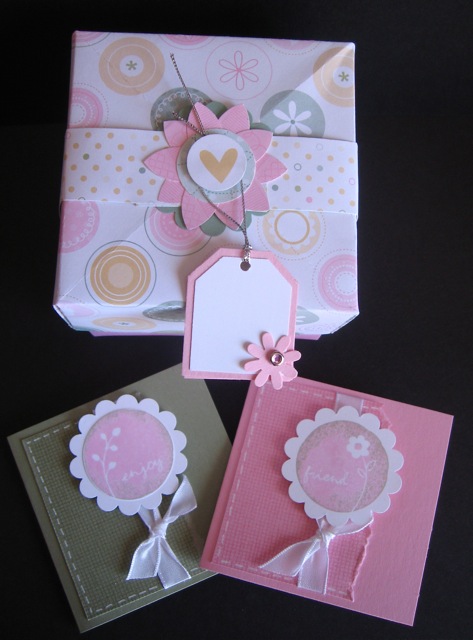
My friend made me a cute origami box from a CNY card few years ago. It was so cute, I used it to keep coins and brooches. This time, I made one for lil Aisyah.

Hope she likes it :)

It is easy to make, yet, how the the end products would look like or how they would be used, are up to your imagination and are endless. You can make it out of origami or nice wrapping papers, shopping catalogs or even money :)


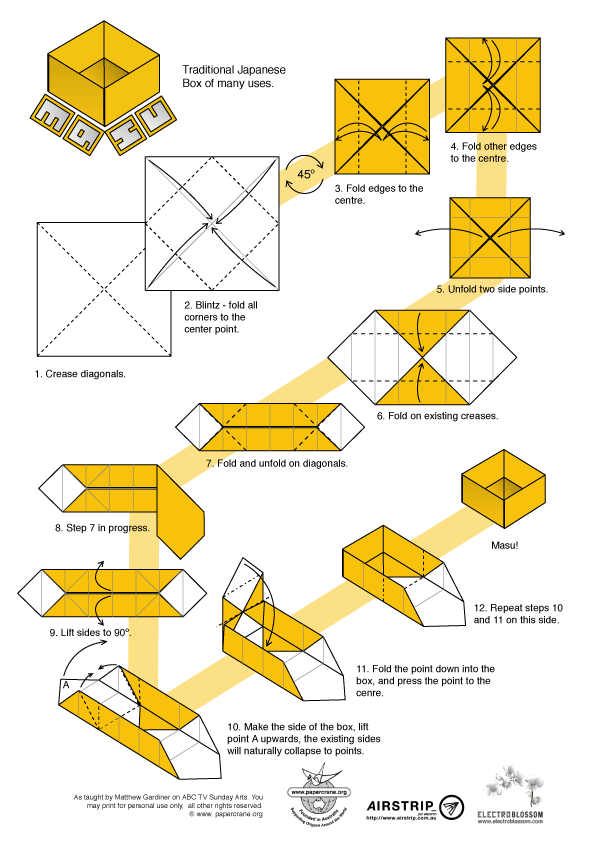
For the step-by-step instruction, please download the following guidelines from papercrane :)


This is my Aisyah's very first origami box.


More Origami Ideas:

1. Origami box with dividers from wombat1138


2. A small door gift with flowers on the lid from Kim

3. Cute Gift Box from Ann


3. Money Box from dadcando (Angpau Raya :P)

4. A matching card for a great gift on some special occasions from Elizabeth Steward

Readmore »

Preserving the Tiny Memories - Hand Print Crafts


There are tons of hand print crafts that we can find on the net, but many only serves as cute displays or plain wall decorations- which is okay, but a realistic mom like me, I was indeed looking for some kind of crafts that could not just preserve her cute tiny hand prints, but are also useful and simple to make. Well, is that too much?
:P


For asking too much, in the end I have to come with my own ideas!

p/s: You only need a pair of the traced hand print for this craft, but I had to make 2 pairs of the prints since Aisyah loved it so much, that I couldnt get any nearer to the first pair anymore. She would pick up her toys and hi-5 me with her foam hands :) Cuteness~

I've traced her hand prints on a foam paper, glued it to the 'photo-magnets', cut it out to the exact size and shape and...

Voila!
An adorable custom made fridge-magnet that is not only simple, but also useful to a mom like me :) Boleh letak notes "things-to-buy" list or postcard from friends, or even her own pictures.
For the time being, Id like to leave it simple and plain. But you could add some cute decorations or even some stencils, poems etc on the hand-prints.. I really love to share some artsy ideas with crafty mommies n brilliant wives out there :) Let me hear from you :)
zakiahhanim [at] gmail com
Readmore »

The Perfect "Kara Age" - Juicy Chicken Recipe

Kara age is a variant on the popular Japanese fried chicken (boneless chicken part). My family loves "kara age" very much, we can simply eat it on its own. This simple recipe makes a very juicy chicken in the inside, while still very crunchy on the outside.
You can use the traditional recipe of kara age that you can find here or may use the following modified recipe from our house :)


Kara Age - Our recipe


Ingredients:
2 tsp of chicken/meat curry powder
1 tsp of pepper + black pepper
a pinch of salt
 a pinch of turmeric
1 1/2 lb boneless skinless chicken thighs
1/4 cup of plain yogurt

1 cup of cornstarch for dusting
oil for frying
lemon wedges for serving (optional)
===========================

Preparing the chicken
Wash the chicken and pat it dry. Make sure the chicken is dry enough. Use paper towel if necessary.
Cut the chicken into small cubes.

Marinating the chicken
Mix curry powder, black pepper, salt, turmeric and the chicken in a bowl. Add  the yogurt and mix well. Leave it for around 10 minutes.

Frying and Serving the Kara Age
Put the cornstarch in a bowl and dredge the chicken to coat.
Deep fry in medium heat until both side is nice and brown.
Kara-age is normally served with slices of lemon :)
====================================
Review
1. The use of yogurt makes the chicken very much soft, tender and juicy in the inside, but still crunchy on the outside.
2. Ive tried to change the corn starch with the all purpose flour and the kara age is still as crunchy as when I used the corn starch (for the coating).

Readmore »

How to centre hard-boiled egg yolks

Cara-cara untuk menjadikan telur kuning berada di tengah-tengah ketika merebus telur.

There are two common ways to perfecting hard boiled egg, so that when you cut the egg open, the hardened yolk should be centered, and the yellowish or greenish yolk color couldnt be seen from the outside.


Rolling the Egg while Cooking

1. The most common technique used by mothers outside there is by rolling the egg continually while boiling to prevent it from rising to the surface. Stir continually.


Adding Some Salt into the Water

2. Do you know that there is simpler way to centre the egg-yolks? Instead of continually rolling it while boiling it, you just add some pinchs of salt into the water and boil it.

Review:

I have tested method 2 and oh my, it was easy. The yolk might not be realllly in the centre but my boiled eggs never failed me :)

Trivias:

1. The Japanese TV programme also aired other interesting way of centering the yolks, that is via pinching the narrowest side of the egg with a needle, once, before you boil them.


 The narrower part of the egg is on the left side, obviously :)

I've tried it once but gosh, if you can imagine how hard it is to get the needle through the hard shell. I ended up pinching my own finger..sakitt.

2. If you plan to store the eggs, keep the narrow point down to beautifully center the yolk.

3. The white egg is 90% water with 10% proteins, while the egg yolk contains most of the protein and all of the fat, vitamins, and cholesterol.

kata kunci: telur, telur rebus, 
Readmore »

Simple Play Dough

This is a simple recipe to make a safe, edible and economic play doughs (aka play-doh) at home.

Ingredients:

1 cup flour
1/2 cup salt
1 cup water
2 tablespoons oil
2 tablespoons cream of tartar
Food colorings


Methods:
1. Mix all the ingredients except food colorings.
2. Stir well on low heat until it does not stick to the pan and form dough-like mixture..

3. Divide the dough into few group, and dye it with vibrant colors of your choice :)

And your kids just couldnt wait :)


Play Dough Storage
Keep the playdough in air-tight container, so that it will not harden and can be used again and again. I wrapped each playdough in plastic wrapping to avoid color transfer.

Review:
1.  This homemade play-dough really has the similar texture, if not a bit softer and easier to play with. I really recommend this to the other moms.

p/s: I had fun making the playdough together with my kid, she seemed to enjoy and appreciate her play-doh more since she had the feeling that she 'made it herself'.
Readmore »

The Homemakers


A. Who is a homemaker?

1. The term homemaker refers to both housewife or househusband and is independent of marital status.

2. Whom involved in school and childrens activities.

3. Where home-centred activities are most important.


B. What does a homemaker do?

1. Cleaning, housekeeping, cooking are part, but not necessarily be, a homemaker's part of duties. A homemaker care for her/his family and home.

2. Few full-time homemakers are involved in paid work outside the home, while some earn by working at home (Working-at-home-moms, WAHM) while many others opt to be devoted to her/his family without any kind of incomes (Staying-at-home-mom, SAHM)

C. What is the intention of "The Simple HomeMaker" blog?

1. To connect the author to the other homemakers. To learn from others' experiences and knowledge.

2. To show that being a homemaker doesn't need to be a stressful, if not a burden, job. There are things to joy and cherish by choosing/being one.

3. To understand that being imperfect is okay. There are times when we failed to accomplish our goal for the day or as a homemaker/ wife, so worry not.

4. To share activities that a homemaker can do, or how to simplify things, to ease the workloads etc. Life should be fun :)

5. To share and to care :)

Sources: ncls
Readmore »